
Soap Base, Uncategorized
Why Is My Soap Cracking After Cooling?
Jun
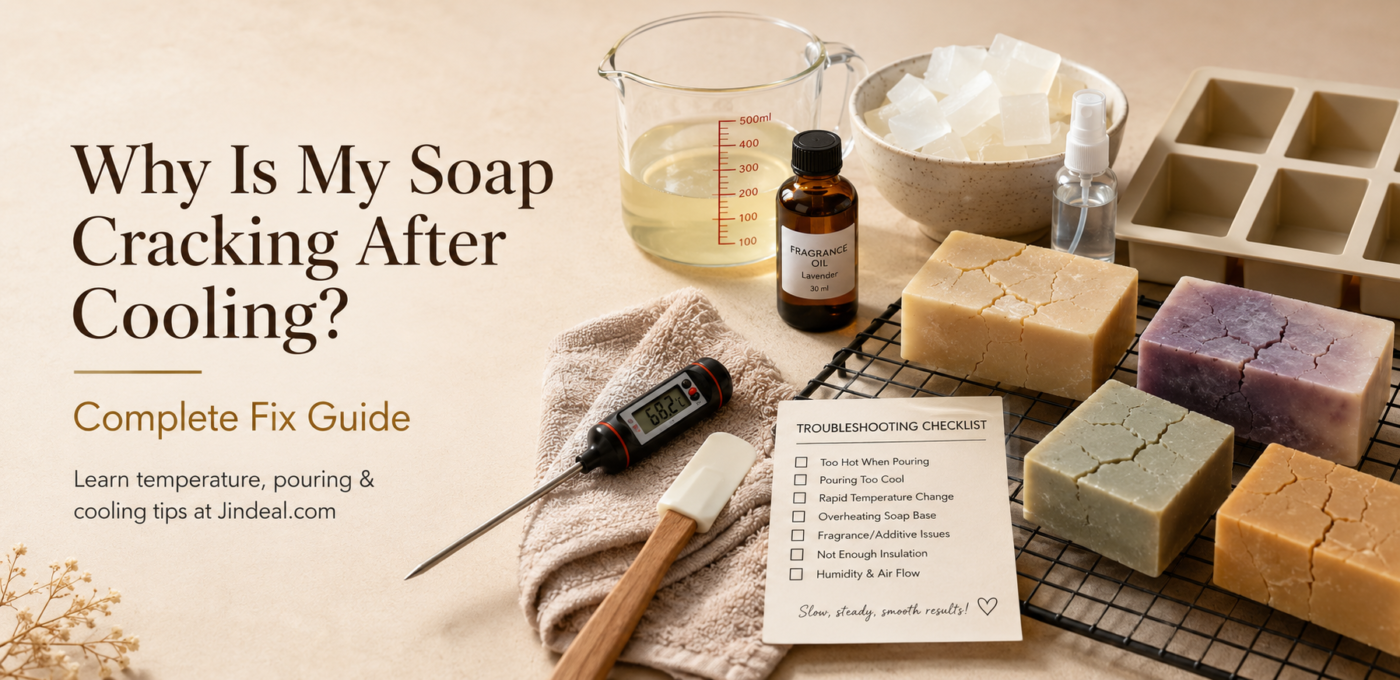
Why Is My Soap Cracking After Cooling? Complete Fix Guide
Learn why melt and pour soap or handmade soap cracks after cooling, demolding, cutting, or storage, and how to fix it with better temperature control, formula balance, additives, and curing.
Quick Answer
Soap cracks after cooling when the soap base is overheated, cooled too quickly, contains too much powder or additive, becomes too dry, or is cut/demolded at the wrong time. To fix it, melt gently, avoid sudden temperature changes, reduce dry additives, pour at the right temperature, and allow proper setting time.
Table of Contents
What Does Soap Cracking Mean?
Soap cracking means visible lines, splits, surface cracks, broken corners, or uneven break marks appear after the soap cools, hardens, demolds, or gets cut. Cracking can happen in melt and pour soap, cold process soap, herbal soap, layered soap, and soaps with powders or clays.
In melt and pour soap, cracking usually happens due to overheating, sudden cooling, too many dry additives, hard or brittle base, pouring into a cold mold, or demolding roughly. In cold process soap, cracks may happen due to overheating, water loss, high temperature, too much hard oil, or cutting at the wrong time.
Cracked soap may still be usable if it smells normal and has no contamination, but it may look unprofessional for selling. For soap business, the goal is smooth, firm, clean, and attractive soap finishing.
For melt and pour soap base, silicone molds, soap colors, fragrance oils, essential oils, clays, herbal powders, packaging, and DIY cosmetic raw materials, visit Jindeal.com.
What Causes the Problem?
Soap cracks when the soap structure becomes stressed during heating, cooling, drying, cutting, or demolding. The most common reason is temperature imbalance or too much dry ingredient in the formula.
Common causes include:
- Overheating melt and pour soap base
- Cooling soap too quickly in the fridge or freezer
- Pouring hot soap into a very cold mold
- Using too much clay, herbal powder, charcoal, turmeric, coffee, or exfoliant
- Using too much hardening additive or dry ingredient
- Demolding soap before it is flexible enough or fully set
- Cutting soap too late when it becomes too hard
- Using a brittle or low-quality soap base
- Sudden temperature change during storage or shipping
- Uneven cooling in thick soap molds
- For cold process soap: overheating, water discount, high hard oils, or cutting time issue
- Rough handling while removing soap from detailed molds
For example, if you add too much charcoal powder or clay to melt and pour soap, the soap can become dry, rough, and more likely to crack. Similarly, if you pour very hot soap into a cold mold and then chill it too fast, surface cracking can appear after cooling.
Soap Cracking Fix Chart
Use this quick chart to identify the reason your soap cracked and the best solution.
| Cracking Problem | Likely Cause | Best Fix |
|---|---|---|
| Surface cracks after cooling | Overheating or rapid cooling | Melt gently and cool at room temperature |
| Soap cracks while demolding | Rough demolding or rigid mold | Use flexible silicone mold and demold carefully |
| Soap breaks while cutting | Soap became too hard or brittle | Cut at the right time and use a sharp soap cutter |
| Cracks near powder particles | Too much clay, herb, charcoal, or exfoliant | Reduce dry additives and disperse properly |
| Layered soap separates or cracks | Layers too cold or not bonded | Pour next layer at correct temperature and spray alcohol |
| Cold process soap cracks on top | Overheating or gel phase issue | Control temperature and avoid over-insulation |
Step-by-Step Solution
Step 1: Identify the Soap Type
First check if you are working with melt and pour soap or cold process soap. Melt and pour soap cracking is usually linked to melting, cooling, additives, and mold handling. Cold process cracking is often linked to formula balance, temperature, water, and curing.
Step 2: Melt Soap Base Gently
For melt and pour soap, cut the base into small cubes and melt slowly. Avoid boiling or overheating. Overheated soap can lose moisture, become rubbery, form bubbles, or crack after cooling.
Use short microwave intervals or a double boiler. Stir slowly and stop heating when the soap base is fully melted.
Step 3: Avoid Sudden Cooling
Do not put hot soap directly into the freezer for quick setting. Rapid cooling can create stress and cause cracks. Allow the soap to set at room temperature whenever possible.
Step 4: Reduce Dry Additives
Too much dry powder can make soap brittle. Use clays, charcoal, turmeric, coffee, oats, herbs, and exfoliants in small tested amounts. Pre-mix powders properly before adding them to the full soap batch.
Step 5: Pour at the Right Temperature
Pouring too hot can affect texture, while pouring too cool can create lumps, lines, or uneven setting. Melt gently, let the base cool slightly, then add fragrance and pour smoothly.
Step 6: Use Flexible Silicone Molds
Rigid molds can cause soap to break during removal. Flexible silicone molds make demolding easier and reduce edge cracking. For detailed molds, release the sides slowly before pushing out the soap.
Step 7: Cut Soap at the Right Time
If you are using a loaf mold, cut the soap when it is firm but not overly hard. If you wait too long, the soap may become brittle and crack while cutting.
Step 8: Fix Layered Soap Cracks
For layered melt and pour soap, spray rubbing alcohol between layers and pour the next layer before the previous layer becomes too cold. If layers do not bond properly, they may separate or crack.
Step 9: Store Soap Properly
Store finished soaps in a cool, dry place. Avoid direct sunlight, hot rooms, damp storage, and sudden temperature changes during shipping.
Step 10: Test Small Batches First
Before making bulk soap, test 100g to 250g batches. Check cracking, sweating, hardness, fragrance, color, and demolding performance. Record your best formula for repeat production.
Common Mistakes
1. Overheating the Soap Base
Overheated melt and pour soap can lose moisture and become more likely to crack after cooling.
2. Cooling Soap Too Fast
Using the freezer or fridge for too long can create sudden temperature stress and condensation.
3. Adding Too Much Powder
Too much clay, charcoal, turmeric, coffee, or herbal powder can make soap dry and brittle.
4. Demolding Roughly
Pulling or forcing soap out of a mold can crack edges and break detailed designs.
5. Using a Rigid Mold
Rigid molds can make soap removal difficult. Flexible silicone molds are better for smooth demolding.
6. Cutting Soap Too Late
If soap becomes too hard before cutting, it may crack or break under pressure.
7. Making Layers Too Cold
If the first layer becomes too cold, the next layer may not bond properly and can crack or separate.
8. Not Spraying Alcohol Between Layers
Rubbing alcohol helps layers stick and reduces bubbles. Skipping it can affect layered soap quality.
9. Using Poor-Quality Soap Base
Low-quality soap base may behave inconsistently and crack more easily.
10. Not Testing Before Selling
Always test soap for cracks, sweating, hardness, and packaging performance before selling.
Expert Tips
- Melt soap base slowly and avoid boiling.
- Do not overuse dry powders, clays, or exfoliants.
- Cool soap at room temperature when possible.
- Use flexible silicone molds for easy demolding.
- Release mold sides gently before removing soap.
- Cut loaf soap when it is firm but not overly hard.
- Spray rubbing alcohol between layers in layered soaps.
- Avoid sudden temperature changes during storage.
- Use good-quality soap base for stable results.
- Make small test batches before bulk production.
- Keep formula records for repeat quality.
- Buy soap base, molds, fragrance oils, colors, clays, herbs, and packaging from Jindeal.com.
FAQ
1. Why is my soap cracking after cooling?
Soap can crack after cooling because of overheating, rapid cooling, too many dry additives, wrong pouring temperature, rough demolding, or brittle formula.
2. Why does melt and pour soap crack?
Melt and pour soap may crack if it is overheated, cooled too quickly, contains too much powder, or is removed roughly from the mold.
3. Can overheating cause soap cracks?
Yes. Overheating can reduce moisture and affect texture, making soap more likely to crack after cooling.
4. Can too much clay crack soap?
Yes. Too much clay or powder can make soap dry, brittle, and more prone to cracking.
5. Should I put soap in the freezer to harden?
A short chill may help demolding, but long freezer storage can cause cracking, sweating, and condensation.
6. Why does soap crack while cutting?
Soap may crack while cutting if it has become too hard or brittle, or if the cutter is dull.
7. How do I prevent cracks in layered soap?
Spray rubbing alcohol between layers and pour the next layer at the right temperature before the previous layer becomes too cold.
8. Can fragrance oil cause cracking?
Fragrance oil usually causes softness or sweating when overused, but some unsuitable oils or poor mixing can affect texture. Always test first.
9. Can I fix cracked melt and pour soap?
Yes, if the soap is otherwise safe, you can remelt it gently and repour. Reduce additives and avoid overheating during the second pour.
10. Is cracked soap safe to use?
If the soap smells normal, has no contamination, and the formula is safe, cracked soap may be usable. But it may not look suitable for selling.
11. Why do soap corners break after demolding?
Corners break when soap is removed too roughly, the mold is rigid, or the soap is too brittle. Use flexible silicone molds and demold gently.
12. Does cold weather crack soap?
Cold temperature can contribute to rapid cooling and texture stress, especially if hot soap is placed into a cold mold or storage area.
13. How do I make soap less brittle?
Use a balanced formula, reduce dry additives, avoid overheating, and choose a good-quality soap base.
14. Can low-quality soap base crack more easily?
Yes. Poor-quality soap base may have inconsistent texture and can crack, sweat, or soften more easily.
15. Where can I buy soap-making supplies?
You can buy melt and pour soap base, silicone molds, fragrance oils, soap colors, essential oils, clays, herbal powders, packaging, and DIY supplies from Jindeal.com.
Final Words
Soap cracking after cooling is usually caused by overheating, rapid cooling, too many dry additives, rough demolding, or cutting at the wrong time. With gentle melting, correct pouring temperature, balanced additives, flexible molds, and proper storage, you can reduce cracks and make smoother handmade soap.
For soap bases, silicone molds, fragrance oils, soap colors, essential oils, clays, herbal powders, cutters, shrink wrap, and DIY soap-making supplies, visit Jindeal.com.
Make Smooth, Crack-Free Soap with Jindeal.com
Shop soap bases, molds, fragrance oils, colors, clays, herbs, cutters, packaging, and DIY cosmetic raw materials from Jindeal.com.