
Uncategorized
How to Fix Wet Spots in Candles
Jun
How to Fix Wet Spots in Candles
Learn why glass jar candles show wet-looking patches, air gaps, or uneven adhesion marks on the container wall, and how to reduce wet spots with better jar temperature, wax selection, pouring, cooling, and storage.
Quick Answer
Wet spots in candles are usually air gaps between wax and the glass jar, not actual liquid oil. They happen due to wax shrinkage, cold jars, fast cooling, temperature changes, poor glass adhesion, or wax type. Reduce them by warming jars, pouring at the right temperature, cooling slowly, and storing candles properly.
Table of Contents
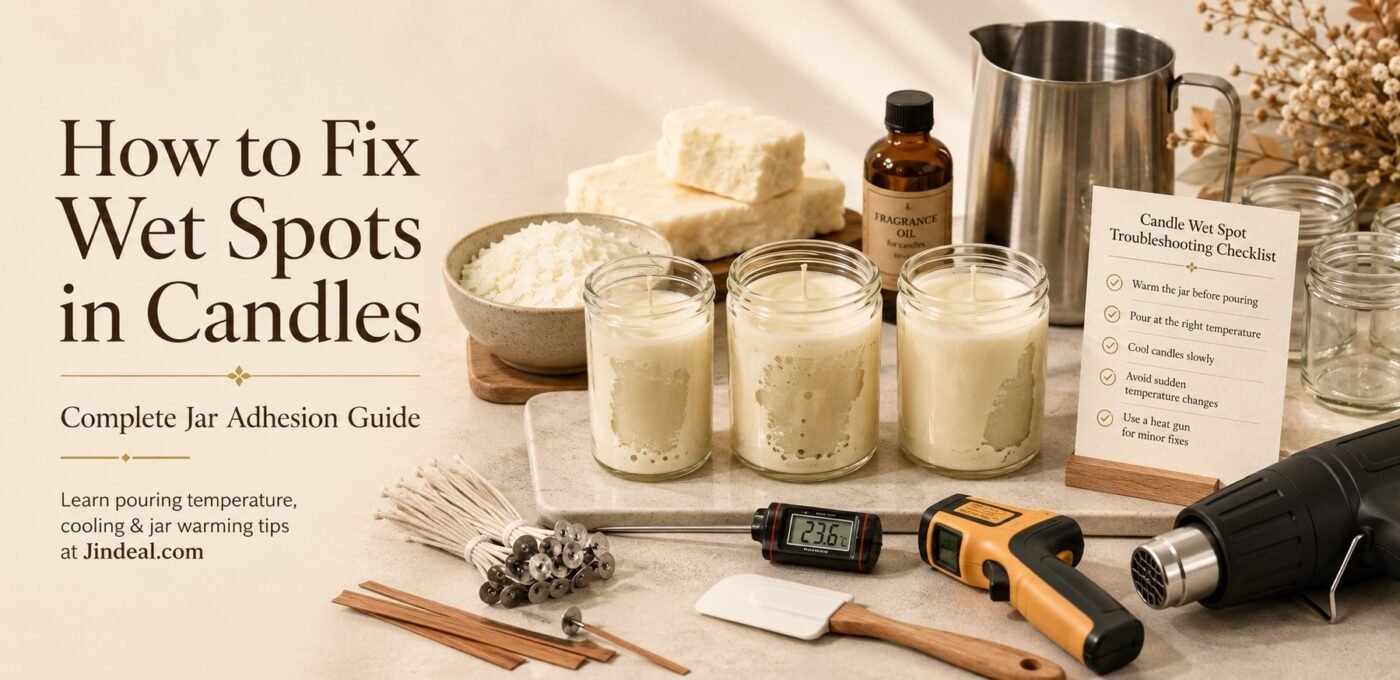
What Are Wet Spots in Candles?
Wet spots are patchy, shiny, or wet-looking marks that appear on the side of glass jar candles. They often look like the wax is oily or wet, but in many cases they are actually small air gaps between the wax and the glass.
Wet spots are common in container candles, especially soy wax candles, paraffin candles, coconut wax blends, and glass jar candles. They are usually cosmetic and do not always mean the candle is unsafe or spoiled.
However, wet spots can make candles look less premium, especially if you sell luxury jar candles. Customers may think the candle is defective, oily, melted, or old even when it burns normally.
For candle wax, candle jars, fragrance oils, wicks, wick stickers, candle colors, thermometers, pouring pots, silicone molds, and DIY candle-making supplies, visit Jindeal.com.
What Causes the Problem?
Wet spots happen when wax pulls away from the glass during cooling or storage. This creates a small space that looks like a wet patch from outside the jar. The main reasons are temperature difference, wax shrinkage, and poor adhesion to glass.
Common causes include:
- Cold glass jars before pouring
- Wax poured too hot or too cool
- Fast cooling after pouring
- Room temperature changes during setting
- Wax naturally shrinking while cooling
- Glass jar surface not clean or dry
- High fragrance oil load
- Fragrance oil not mixed properly
- Moving candles before fully set
- Storing candles in heat, cold, or sunlight
- Using wax with poor container adhesion
- Skipping small-batch tests before bulk production
For example, if hot wax is poured into a cold glass jar and then cooled quickly under a fan, the wax may shrink away from the glass and form visible wet spots.
Wet Spots Fix Chart
Use this chart to identify the reason for wet spots and the best solution.
| Wet Spot Problem | Likely Cause | Best Fix |
|---|---|---|
| Wet patches on jar sides | Wax pulled away from glass | Warm jars slightly and cool slowly |
| Wet spots near bottom | Cold surface or uneven cooling | Keep jars on stable room-temperature surface |
| Large shiny gaps after cooling | Pour temperature or fast cooling issue | Test different pouring temperatures |
| Wet spots after storage | Temperature changes during storage | Store candles in cool, dry, stable conditions |
| Oily surface plus wet spots | Too much fragrance or poor mixing | Reduce fragrance load and mix thoroughly |
| Wet spots in every batch | Wax type or jar adhesion issue | Test another wax blend or jar type |
Step-by-Step Solution
Step 1: Clean and Dry the Candle Jars
Before pouring wax, make sure the candle jars are clean, dry, and free from dust, oil, water, fingerprints, or manufacturing residue. Any contamination can reduce wax adhesion to glass.
Step 2: Warm the Jars Slightly
Cold jars are one of the main reasons for wet spots. Slightly warming the glass before pouring helps reduce temperature shock and improves wax adhesion.
The jar should only be mildly warm and safe to handle. Do not overheat the glass.
Step 3: Use the Right Wax for Container Candles
Some waxes have better glass adhesion than others. If wet spots appear in every batch, test a container wax or wax blend designed for jar candles.
Step 4: Control Wax Temperature
Use a thermometer to control melting, fragrance adding, and pouring temperatures. Pouring too hot or too cool can both create wet spots depending on wax type and room conditions.
Follow the wax supplier’s recommended pouring temperature and record the result of each test batch.
Step 5: Add Fragrance Correctly
Use candle-grade fragrance oil within the recommended fragrance load. Too much fragrance or poor mixing can cause oil spots, weak adhesion, surface sweating, or poor burn.
Step 6: Mix Slowly and Thoroughly
After adding fragrance oil, stir slowly but thoroughly so the oil bonds evenly with wax. Poor mixing can create uneven texture and appearance issues.
Step 7: Pour Slowly and Steadily
Pour wax slowly into the jar to reduce air pockets and uneven cooling. Avoid splashing wax on the jar walls.
Step 8: Cool Candles Slowly
Fast cooling can increase wet spots. Let candles cool naturally at stable room temperature. Avoid fans, AC airflow, fridge, freezer, cold floors, and open windows.
Step 9: Do Not Move Candles While Setting
Moving candles before the wax sets fully can disturb adhesion and create uneven wax contact with the glass.
Step 10: Store Candles Properly
After curing, store candles in a cool, dry place away from sunlight, heat, cold, and temperature swings. Storage changes can create wet spots even after the candle looked perfect after pouring.
Step 11: Test Small Batches Before Bulk Production
Make small test batches and compare jar temperature, pour temperature, wax type, fragrance load, cooling method, and storage result. Check candles after 24 hours, 7 days, and 2 to 4 weeks.
Common Mistakes
1. Thinking Wet Spots Are Always Oil
Wet spots often look oily, but many are actually air gaps between wax and glass.
2. Pouring into Cold Jars
Cold jars can cause wax shrinkage and poor adhesion.
3. Cooling Candles Too Fast
Fans, AC, fridge, freezer, or cold surfaces can increase wet spots.
4. Not Cleaning the Jar
Dust, moisture, and fingerprints can reduce wax adhesion to glass.
5. Adding Too Much Fragrance Oil
High fragrance load can cause sweating, oily patches, or poor wax structure.
6. Guessing Pour Temperature
Without a thermometer, results become inconsistent from batch to batch.
7. Moving Candles During Setting
Movement can disturb wax adhesion and create marks on jar sides.
8. Storing Candles Near Heat or Sunlight
Temperature changes can create wet spots after the candle is already finished.
9. Using the Wrong Wax
Some waxes naturally have poor glass adhesion. Test wax blends if appearance is important.
10. Selling Without Appearance Testing
Check candle appearance after storage, not only immediately after pouring.
Expert Tips
- Use clean, dry candle jars.
- Warm jars slightly before pouring wax.
- Use wax suitable for container candles.
- Use a thermometer for melting and pouring.
- Follow wax supplier temperature guidelines.
- Use candle-grade fragrance oil within recommended percentage.
- Mix fragrance slowly and thoroughly.
- Pour steadily without splashing wax on jar walls.
- Cool candles slowly at stable room temperature.
- Avoid fans, AC, fridge, freezer, and cold surfaces.
- Test candles after 24 hours, 7 days, and 2 to 4 weeks.
- Buy candle wax, jars, fragrance oils, wicks, thermometers, and packaging from Jindeal.com.
FAQ
1. What are wet spots in candles?
Wet spots are shiny or wet-looking patches on glass jar candles, usually caused by air gaps between wax and glass.
2. Are candle wet spots actual oil?
Not always. Many wet spots are not oil but areas where wax has pulled away from the glass.
3. Are wet spots in candles bad?
Wet spots are usually cosmetic and do not always affect burning, but they can make candles look less premium.
4. Why do soy candles get wet spots?
Soy wax can shrink or pull away from glass during cooling and storage, especially with temperature changes.
5. How do I prevent wet spots in candles?
Warm jars slightly, use correct pour temperature, cool slowly, avoid temperature swings, and use wax suitable for container candles.
6. Can cold jars cause wet spots?
Yes, cold jars can cause poor adhesion and visible wet-looking patches after the wax cools.
7. Can fast cooling cause wet spots?
Yes. Fans, AC, fridge, freezer, and cold surfaces can increase wet spots and other surface defects.
8. Can too much fragrance oil cause wet spots?
Too much fragrance oil can cause oily patches, sweating, poor wax structure, and appearance issues.
9. Can I fix wet spots after the candle is made?
Minor wet spots may reduce if the candle is warmed gently, but the best solution is prevention through process control.
10. Do wet spots affect candle fragrance?
Wet spots are mainly visual, but poor fragrance mixing or high fragrance load can affect both appearance and scent throw.
11. Does wax type affect wet spots?
Yes. Some waxes have better glass adhesion than others. Testing wax blends can improve appearance.
12. Should I use a thermometer for candle making?
Yes. A thermometer helps control melting, fragrance adding, and pouring temperatures for consistent results.
13. Can storage create wet spots later?
Yes. Heat, cold, sunlight, and temperature changes can create wet spots even after the candle looked fine initially.
14. Can I sell candles with wet spots?
You can sell candles if they are safe and tested, but visible wet spots may reduce premium appearance and customer confidence.
15. Where can I buy candle-making supplies?
You can buy candle wax, jars, wicks, fragrance oils, wick stickers, colors, thermometers, molds, packaging, and DIY candle-making supplies from Jindeal.com.
Final Words
Wet spots in candles are common, especially in glass jar candles and soy wax candles. They usually happen because wax pulls away from the glass due to cooling, temperature changes, wax shrinkage, or poor adhesion.
To reduce wet spots, clean and warm jars, use the right wax, control pouring temperature, mix fragrance properly, cool candles slowly, and store them in stable conditions. For candle wax, jars, fragrance oils, wicks, colors, thermometers, molds, and packaging, visit Jindeal.com.
Make Better-Looking Jar Candles with Jindeal.com
Shop candle wax, jars, fragrance oils, wicks, colors, thermometers, pouring pots, packaging, and DIY candle-making materials from Jindeal.com.