
Uncategorized
Why is my candle tunneling
Jun
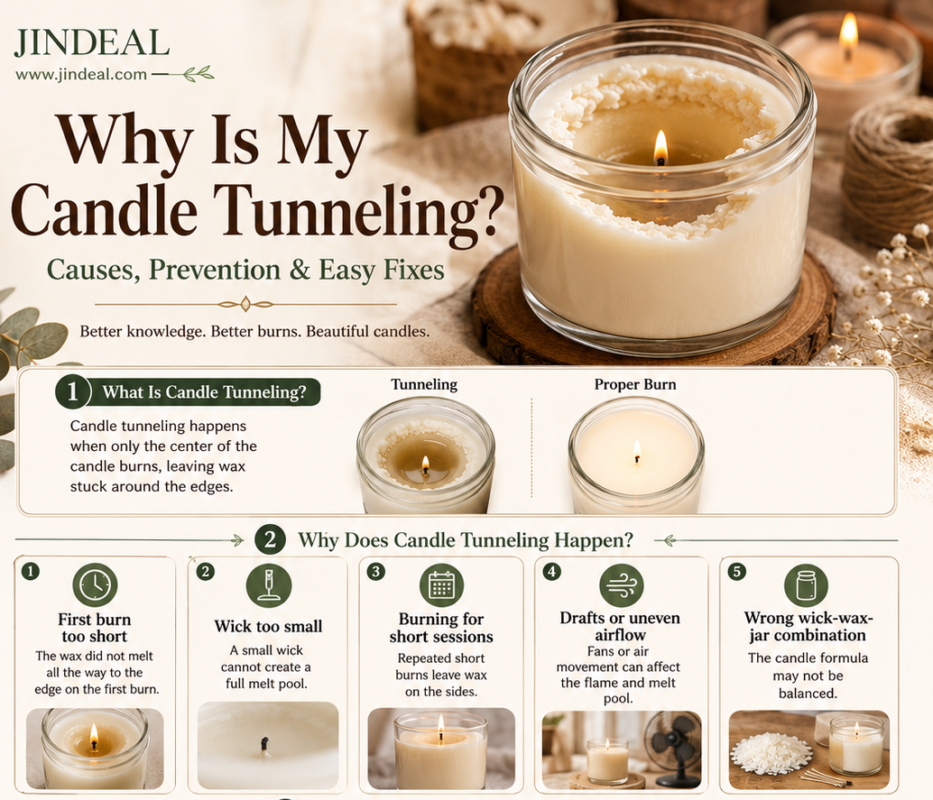
Why Is My Candle Tunneling? Causes, Prevention & Easy Fixes
Candle tunneling is a common candle-burning problem where only the center of the candle melts and the wax near the jar wall remains hard. After a few burns, the candle starts forming a deep hole around the wick. This not only looks bad but also wastes wax, reduces fragrance performance, and can make the wick drown inside melted wax.
If you make handmade candles, tunneling is a sign that something needs adjustment in your candle design or burn habit. The problem may be due to a short first burn, wrong wick size, wide jar, unsuitable wax-wick combination, too much fragrance oil, poor curing, or burning the candle in a drafty area.
In this detailed Jindeal guide, you will learn what candle tunneling is, why it happens, how to fix a tunneling candle, and how to prevent this problem before selling, gifting, or using your handmade candles.

Image suggestion: upload the candle tunneling image to your WordPress Media Library and replace the image URL above with your uploaded image URL.
What Is Candle Tunneling?
Candle tunneling happens when the wax melts only around the wick and does not reach the sides of the container. Instead of creating a smooth, even wax pool across the full candle surface, the flame burns downward into the center and leaves a thick wall of unused wax around the jar.
A properly made and properly burned candle should melt evenly from the center toward the edges. The top layer should form a full melt pool during the right burn time. If the melt pool is too small, the candle begins to remember that smaller burn area. This is called a memory ring.
Once a memory ring forms, the candle may continue burning inside that same narrow area every time you light it. That is why the first burn is very important, especially for container candles made with soy wax, paraffin wax, coconut wax, beeswax, or wax blends.
Why Does Candle Tunneling Happen?
1. First Burn Was Too Short
The first burn sets the pattern for future burns. If you blow out the candle before the wax melts close to the jar edges, the candle can create a memory ring. On the next burn, the candle may follow the same smaller melt pool and tunnel downward.
2. Wick Is Too Small
A small wick cannot generate enough heat to melt wax across the full jar diameter. This is one of the most common reasons for tunneling in handmade container candles.
3. Jar Is Too Wide
If the jar is wide but the wick is too small, heat will remain near the center. The candle may look beautiful, but the burn performance will be poor.
4. Short Burning Sessions
Lighting a candle for only 10 to 20 minutes again and again can create tunneling. The wax needs enough time to melt evenly across the top.
5. Drafts or Uneven Airflow
Fans, AC vents, open windows, or strong airflow can push the flame to one side. This causes uneven heating and can create an irregular wax pool.
6. Wax and Wick Not Tested
Different waxes burn differently. Soy wax, paraffin wax, beeswax, coconut wax, and blended waxes need different wick sizes. A wick that works in one wax may fail in another.
7. Too Much Fragrance Oil
Excess fragrance oil can affect wax structure and burn quality. If the fragrance load is too high, the candle may burn weakly, sweat fragrance, or tunnel.
8. Wrong Wax Hardness
Very hard wax or wax that is not suitable for container candles may need a stronger wick. If the wick cannot melt the wax properly, tunneling can start.
How to Prevent Candle Tunneling
1. Let the First Burn Create a Full Melt Pool
The first burn should be long enough to melt the top wax layer close to the edges of the jar. A common practical guideline is around 1 hour of burn time for every 1 inch of candle diameter. For example, a 3-inch wide candle may need around 3 hours for the first burn. This is only a guideline, so you should always test your own candle formula.
2. Use the Correct Wick Size
Wick size is one of the most important parts of candle making. A wick that is too small can cause tunneling. A wick that is too large can create excess heat, smoke, soot, mushrooming, fast wax consumption, or unsafe jar temperature. The correct wick gives a stable flame, even melt pool, good fragrance throw, and clean burn.
3. Match Wick with Wax, Jar and Fragrance
The best wick depends on multiple factors: wax type, jar diameter, fragrance oil percentage, colour, additives, room temperature, and candle design. Never select a wick only by jar size. Always test the complete formula.
4. Burn Candles for Enough Time
Avoid lighting a candle for only a few minutes. Short burns are one of the fastest ways to create tunneling. Let the candle burn until a good melt pool forms. For safety, do not burn candles for extremely long periods continuously.
5. Keep Candles Away from Drafts
Burn candles away from fans, AC vents, windows, coolers, and strong airflow. A steady flame helps the wax melt evenly. If the flame keeps moving, the wax pool may become uneven.
6. Trim the Wick Before Each Burn
Trim the wick to around 1/4 inch before lighting. A properly trimmed wick gives better flame control and helps reduce soot, smoke, and uneven burn.
7. Allow Candles to Cure Before Testing
Many candles need curing time after pouring. Curing allows wax and fragrance oil to bind better. If you test too early, the burn result may not show the final performance. Cure time depends on the wax type and formula.
8. Keep Records of Every Test
If you are making candles for sale, keep a test sheet. Write jar size, wax type, wick size, fragrance percentage, dye quantity, pour temperature, cure time, burn time, melt pool size, flame behaviour, and jar temperature. This helps you improve your formula step by step.
How to Fix a Candle That Is Already Tunneling
If your candle has already started tunneling, do not worry. If the tunnel is not too deep, you can often correct the surface and continue using the candle. Below are the most common fixing methods.
Method 1: Foil Method
- Light the candle safely.
- Wrap aluminium foil around the top edge of the candle jar.
- Keep a small opening in the center for the flame and airflow.
- Let the trapped heat slowly melt the wax near the edges.
- Remove the foil carefully when the top wax becomes more even.
The foil method works because the foil reflects heat back toward the unmelted wax on the sides. It is useful for mild tunneling, but it must be done carefully and safely.
Method 2: Hair Dryer or Heat Gun Method
- Use a hair dryer or heat gun on low heat.
- Warm the top wax surface carefully.
- Melt the uneven wax around the edges.
- Do not overheat the jar or wax.
- Let the wax cool and set before the next burn.
Method 3: Candle Warmer Method
A candle warmer can help melt the top wax layer evenly without using the flame. This can be helpful when the wick is weak or when the candle has a lot of wax stuck on the sides.
Method 4: Remove Excess Side Wax Carefully
If a lot of wax has built up around the sides, you can carefully remove a small amount of soft wax from the edges to help the flame recover. Do this only when the candle is cool enough to handle safely.
Does Candle Tunneling Ruin a Candle?
Not always. If tunneling is caught early, it can often be corrected. But if the tunnel becomes very deep, the wick may drown in wax, the flame may become weak, and a lot of wax may remain unused on the jar sides.
For candle makers, tunneling should be treated as a testing signal. It means the candle may need a different wick, different jar size, different wax blend, lower fragrance percentage, or better burn instructions for customers.
Quick Troubleshooting Table
| Problem | Possible Reason | Solution |
|---|---|---|
| Candle burns only in the center | First burn was too short or wick is too small | Burn longer during the first burn and test a larger wick |
| Wax remains on jar sides | Wick heat is not reaching the edges | Match wick size with jar diameter and wax type |
| Flame becomes very small | Wick may be drowning in melted wax | Remove excess wax carefully or use the foil method to level the top |
| Candle burns unevenly | Drafts, fan, AC or uneven surface | Burn candle in a stable area away from airflow |
| Jar gets too hot | Wick may be too large | Test a smaller wick and check jar safety |
| Good melt pool but smoky flame | Wick may be too large or wick not trimmed | Trim wick and test correct wick type |
| Weak fragrance throw | Too small melt pool or poor wax-fragrance binding | Test wick size, cure time and fragrance percentage |
| Top wax melts too fast | Wick may be too large | Test smaller wick size and monitor jar temperature |
Candle Making Tips to Avoid Tunneling
- Choose the correct jar diameter for your candle design.
- Use the right wick size for your wax and fragrance load.
- Keep fragrance oil percentage within recommended limits.
- Do not over-colour candles because excess dye can affect burn quality.
- Let candles cure properly before burn testing.
- Always test one candle before making a large batch.
- Record wick size, wax type, fragrance oil percentage, jar size, and burn result.
- Burn test in normal room conditions, away from strong airflow.
- Check jar temperature during testing for safety.
- Give customers proper candle care instructions with every candle.
Best Jindeal Products for Better Candle Making
To reduce candle tunneling and improve burn quality, use good quality candle making ingredients and tools from Jindeal.com. Proper wax, wick, jar, fragrance oil, colour, and testing tools can help you create better handmade candles.
- Candle Waxes and Butters
- Candle Fragrance Oils
- Candle Jars and Containers
- Candle Molds
- DIY Tools for Candle Making
Customer Candle Care Instructions You Can Add to Packaging
If you sell candles, customer burn habits also matter. You can add the below simple candle care message on your label, insert card, or product page:
For best results, burn your candle long enough to allow the top wax layer to melt evenly. Trim the wick to about 1/4 inch before each use. Keep the candle away from fans, windows, and drafts. Do not burn unattended. Stop use when only a small amount of wax remains at the bottom.
Final Advice for Candle Makers
Candle tunneling is common, but it can be controlled with correct candle-making practices. The most important steps are: allow a full melt pool on the first burn, use the correct wick size, match the wick with the jar and wax, avoid short burn sessions, and test every candle formula before selling.
If you are building your candle business, small tests can save you from big customer complaints later. Keep a proper record of your wax, wick, jar, fragrance oil, colour and burn test results. With the right supplies and testing, you can make beautiful candles that burn evenly and look premium.
Visit Jindeal.com for Candle Making Supplies
FAQs About Candle Tunneling
Why is my candle tunneling?
Your candle is tunneling because the wax is not melting evenly across the full surface. Common reasons include a short first burn, small wick, wide jar, short burn sessions, drafts, or an untested wax-wick combination.
How do I stop a candle from tunneling?
Allow the first burn to create a full melt pool, burn the candle for enough time, keep it away from drafts, and use the correct wick size for the jar and wax.
Can I fix a tunneling candle?
Yes, if tunneling is not too deep. You can try the foil method, gently warm the top with a hair dryer, use a candle warmer, or carefully remove excess side wax.
How long should I burn a candle the first time?
A common guideline is about 1 hour for every 1 inch of candle diameter, or until the top wax melts close to the edges. Always test your specific candle formula.
Does wick size affect tunneling?
Yes. A wick that is too small may not generate enough heat to melt the wax across the jar, causing tunneling. A wick that is too large may cause overheating, soot, or unsafe jar temperature.
Is candle tunneling a manufacturing defect?
It can be caused by candle design, wick size, wax formula, or user burn habits. For handmade candles, proper burn testing is important before selling.
Can soy candles tunnel more than paraffin candles?
Soy wax can tunnel if the wick is too small or the first burn is too short. Paraffin candles can also tunnel if the wick, jar, and formula are not balanced. Testing is required for every wax type.
Can too much fragrance oil cause tunneling?
Yes, excess fragrance oil can affect burn performance. It can make the flame weak, reduce melt pool quality, and increase the chance of tunneling or poor fragrance throw.
SEO Details
SEO Title: Why Is My Candle Tunneling? Causes, Prevention & Easy Fixes
Meta Description: Complete guide on why candle tunneling happens, how to fix it, and how to prevent tunneling in handmade candles using the correct wick, wax, jar size, burn time and candle making supplies from Jindeal.com.
Focus Keyword: why is my candle tunneling
Secondary Keywords: candle tunneling, how to fix candle tunneling, prevent candle tunneling, candle burn problems, candle wick size, handmade candle problems, candle first burn, candle memory ring
Slug: why-is-my-candle-tunneling
Tags: candle tunneling, candle making tips, candle burn problems, wick size, candle wax, candle jar, handmade candles, DIY candles, Jindeal candle supplies, candle care
Suggested Image ALT: Why is my candle tunneling causes prevention and easy fixes